Mostrando postagens com marcador Tutorial. Mostrar todas as postagens

segunda-feira, 18 de fevereiro de 2013

DD Fire Rat Rod Department - Tutorial


Olá a todos os amantes das minis customizadas!
Hello lovers of the customized little cars!


Fazia muito tempo que eu não publicava uma DD customizada (Dairy Delivery - hot wheels). Devo confessar que foi um dos meus trabalhos mais elaborados e difícil.

Peço desculpas pelo atraso na publicação. O motivo foi que eu resolvi transformar a publicação em um tutorial de pintura completo e atualizado. Eu desisti da técnica do sal, pela sujeira que fazia e acabei aperfeiçoando a maneira de fazer o envelhecimento e ferrugem do estilo Rat Rod!
 

I was a long time without did a customized one DD (Dairy Delivery - hot wheels). I must confess that was one of my jobs more elaborate and difficult.
I apologize for the delay in publication. The reason was that I decided to turn it into a painting tutorial complete and updated. I gave up the technique of salt because the dirt that was doing was drive me crazy. So I decided perfecting the way to make the aging and rusting Rat Rod style! 
A vítima!
The victim!


A construção:
Após cortar todas as partes desnecessárias, eu tive que reconstruir a parte de traz do caminhão com poliestireno (PS). São as partes brancas.


The construction:

After cutting all unnecessary parts, I had to rebuild the rear of the truck with polystyrene (PS). The white parts.


As rodas foram trabalhadas conforme o tutorial já publicado antes, clique aqui!
The wheels were worked as the tutorial already posted before, click here!


Finalizada toda a construção, chegou a hora de pintar:
Como sempre, a primeira camada de tinta foi a branca, neste caso uma base de primer para funilaria.


Completed all the construction, it's time to paint:

As always, the first coat of paint was the white, in this case, it was a basic for car bodywork.


A segunda camada pintada foi da cor vermelha.

The second layer was painted the red color.


Essa é a grande mudança na técnica. Ao invés de usar o sal para fazer uma "mascara" da ferrugem, eu decidi reirar a tinta com um estilete. Com muito cuidado eu fui marcando os pontos onde a ferrugem atuaria naturalmente, alguns pontos mais profundos (retirando todas as camadas de tinta até chegar ao zamaque), em outros só retirando a tinta vermelha.
O objetivo foi o de criar um leve relevo no acabamento final do trabalho.
 
That's the big change in the technique. Instead of using salt to make a "mask" of the rust, I decided remove ink with a  X-Acto knife. With great care I was marking the places where the rust should act naturally, some deeper points (enough to removing all layers of paint until you reach the zamaque) in others only by removing the red ink.

The goal was to create a relief in the end work.


Com um pincel fino e usando a cor marrom escuro, foi cobrindo os "buracos" abertos com o estilete.
 
With a fine brush and using a dark brown color, was covering the "hole" opened with the X-Acto knife.


Com todos os "buracos" pintados, vem a parte mais difícil da técnica, que é feita no aerógrafo.
 
With all the "holes" painted, comes the most difficult part of the technique, which is made in the
airbrush.


O segredo nessa parte é conseguir um tom de laranja que fique próximo da cor da ferrugem. a tinta me questão é bem diluída para que não cubra por completo o marrom escuro usado com pincel.
1 - Primeiro, com movimentos circulares pequenos, eu vou espalhado a tinta ao redor dos pontos pintados de marrom escuro.
2 - Com movimentos rápidos na horizontal, eu simulo o "escorrido" da ferrugem pela ação do tempo.
Neste caso como a custom tinha partes na cor vermelha e o laranja diluído não cobre, eu usei o mesmo marrom, diluído, para pitar essas partes.
 
 
The secret in this part is to get a shade of orange that is near the color of rust. The ink must be diluted to not completely cover the dark brown used with brush.
1 - First, with small circular movements, I'm spreading the paint around the points painted dark brown.
 
2 - With quick movements horizontally, I'm going simulate the "stain" rust by time.
 
In this case as the custom had parts in red and the orange diluted does not cover it, I used the same brown, diluted, to paint the red parts. 


Confiram o resultado final!
Check out the end result!


Obrigado a todos, espero que tenham gostado e que a espera pela publicação tenha valido a pena.
Um grande abraço!


Thanks everyone, hope you enjoyed it and that the waiting for the publication has   been rewarding

A big hug!


quarta-feira, 17 de outubro de 2012

'69 Chevy Custom - Rat Style

Olá pessoal!
Hi people!
 
 
Atendendo a pedidos, aqui está a chevy pickup 1969 que estava escondida na garagem da postagem anterior!
Achei que essa passaria sem ninguém perceber... engano meu!
 
Attending to requests, it's here, the 1969 chevy pickup that was hidden in the garage of the previous post!


I was thinking that no one would notice ... my mistake!


A vítima.
the victim
 
 
Mais um rat style utilizando as técnicas apresentadas no tutorial postado aqui anteriormente.
 
This is another Rat style using the technique submitted in the tutorial posted here above.


Tutorial de como simular rodas de ferro usando rodas originais de plástico da Hot wheels.
Tutorial of how to simulate the iron wheels using the original wheels Hot wheels of plastic.


Antes de fechar esta postagem, um breve tutorial de como são feitas as rodas. Esse eu estava devendo a algum tempo.
Before close this post, a short tutorial of as the wheels are made. This I owed some time.


O segredo nessa parte é usar thinner para alisar a parte lixada.
 
The secret in this part is using a strong solvent to smooth the sanded area.
 
 
Depois de pintar de branco, eu pinto o interior da roda, neste caso amarelo.
After the white paint, I painted the inside of the wheel, in this case yellow.
 
 
Para retirar o branco que borra um pouco a banda do pneu, use a dremel para lixar e retirar o branco indesejável.
Para finalizar, eu costumo usar um rebite ou taxinha, cortado para simular uma calota.
 
To remove the white smeared ink of the outside of the tire, I used the dremel to sanding and remove that undesirable white.
 
To finish, I usually use a rivet or a pin, to simulate a hubcap.
 
 
Obrigado a todos, t+!
 
Thanks to everyone and cya!
 
Gracias a todos!!

terça-feira, 2 de outubro de 2012

Rust Paint Tutorial Advanced - '83 Chevy Silverado


Olá amiginhos das customs!
Hello friends of the customs!

 
Faz algum tempo que eu prometi um tutorial avançado sobre pintura estilo rat rod (rust paint).
Hoje, após 2 anos, testando e aprendendo com minhas experiências, concluí este tutorial. Espero que vocês curtam.

Make some time I have promised a advanced tutorial about rat rod paint style (rust paint).

Today, after 2 years, testing e learning with my experiences, i finished this tutorial. I hope you like it.


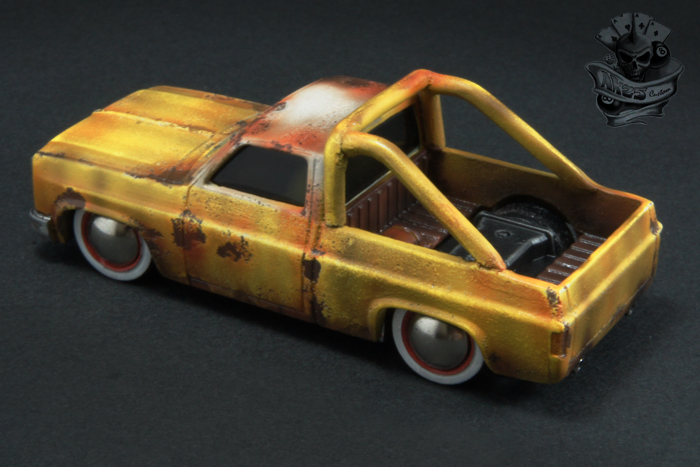
A vítima deste tutorial foi a '83 Chevy Silverado.
The victim this tutorial was a '83 Chevy Silverado.


1º passo: Eu removi toda a tinta (ou quase) e depois lixei bem a carroceria para tirar a maior parte das imperfeições e emendas. Este processo ajuda na fixação da tinta, porque neste caso eu não usei nenhum primer para metal como base.
Step 1: I removed all the paint (or almost) and after I sanded the car body to remove all the imperfections and splices. This process aids in fixing the ink, because in this case I didn't use any primer for metal as a base.


2º passo: A primeira camada de tinta é a ferrugem, assim por dizer. A cor que eu costumo usar é um marrom puxado para o vermelho, deve ser um tom que se aproxime bastante da ferrugem. Com o aerógrafo e a tinta preta bem diluída eu fui marcando algumas diferenças de tonalidades no marrom, principalmente próximo aos vãos de porta, capô e detalhes em alto relevo. Para um efeito mais realista nas laterais eu fiz várias linhas verticais em preto, como se a sujeira tivesse escorrido com a ação da chuva, deixando o envelhecimento mais natural.
Step 2: The first layer of ink is a rust. The color I usually use is a brown, pulled to red. This should be very similar to the real rust color. Using the airbrush and black ink very diluted, I did the different shades on the brown, mainly near the doorways, hood and embossed details. To a good-looking in the sides I did some vertical lines with the black color. Because it's simulated the dirty drained by the rain to look more natural the rust.


3º passo: Com a tinta prata de uma caneta sakura, eu utilizei a técnica de Dry Brush para dar um aspecto de metal mais realista. Outra vantagem é que essa tinta é resistente a água e ajuda a fixar melhor a cor da base, o que facilita o próximo passo. 

Step 3: Using a silver sakura pen and the dry brush technique I did a simulate a metal more realistic. Another advantage is: That ink is water resistant and helps to fix better the base color, which facilitates the next step. 


4º passo: Agora que a base está pronta vem o "tempero". Com um pincel fino e água, eu fui umedecendo pequenas partes onde eu queria que a ferrugem aparecesse. Logo após umedecer uma parte, eu acrescentei sal (a gosto). Com um pincel seco, eu fui removendo o excesso do sal como mostra as fotos abaixo.

Step 4: Now the base is ready is time to "spice". With a fine brush and water, I have been wetting the parts where I wanted the rust to appear. After wetting a part, I added salt (to taste). Using a dry brush, I have been removing the over of salt as the photo below shows.


5º passo: Depois de todo o sal aplicado (servindo de máscara) eu apliquei a primeira cor na pick-up, neste caso eu escolhi a cor branca, mas poderia ser qualquer outra. Uma dica é usar a primeira camada branca ou um tom mais clara que a camada final.

Step 5: After all salt application as a mask, I painted the first color of the pick-up. In this case I chose the white color, but it's can be any other color. One tip is use the first layer white or some tone lighter as the final layer. 


6º passo: Com uma máscara adesiva eu isolei o teto e apliquei a tinta amarela como a segunda cor do carro.

Step 6: With the adhesive mask, I've isolated the car ceiling and I used a yellow ink as a second color. 


7º passo: Agora eu removi com cuidado tudo o sal.

Step 7: Now I removed carefully all the salt.


8º passo: Usando a cor laranjada, bem diluída no aerógrafo, eu fui contornando as partes marrons da primeira camada da pintura. Lembre-se sempre de respeitar o sentido de que a chuva iria marcar a pintura com a ferrugem. Alguns pontos aleatórios auxilia no envelhecimento.

Step 8: Using the orange color, very dilute on the airbrush, I have been circumventing the brown parts of the first layer of paint. Always remember to respect the sense that the rain would mark the paint with rust. Some random spots helps in aging.


9º passo: Como eu queria uma aparência muito real de envelhecimento, eu fiz mais umas "manchas" com a tinta preta bem diluída usando o aerógrafo (como no 2º passo). Para finalizar, com uma lixa d'água 2000, eu fui lixando suavemente  e com muito cuidado, desgastando a pintura. (neste passo, que a base mais clara ou branca se torna importante para este efeito, 5º passo)

Step 9: How I wanted to a real appearance of very aging, I did more black tones using a black ink very dilute on the airbrush (like the step 2). To finish, using a water sandpaper 2000, I was sanded softly and very carefully, removing the last layer. (In this step, the lighter color base or white, become important to this effect, step 5)


Para finalizar, verniz acrílico fosco para proteger a pintura, esperar secar bem e está pronto!

To ending, acrylic matte varnish to protect the paint, wait it to dry well and is ready!

Confiram o resultado final!

Check out the end result!


Muito obrigado pela força pessoal!

T+

Thank you for the support!

Cya!